Thursday, October 30, 2014
How to Hard Reset O2 Xphone 2
How to Hard Rese O2 Xphone 2 / Xphone 2M, SDA / Like those:
1. Turn off your xphone2. press and hold left + right soft menu key
3. while still holding left+right soft menu key, press the on/off button ONCE and RELEASE.
4. keep left + right soft key pressed until you see the message:
"Press 0 to restore fatory setting, other key to quit"
5. press 0 and wait for the phone to boot up, the restoring of factory default will begin and will ask to reboot your phone when done.
How to Hard Reset Nexus One
How to Hard reset for Nexus One
1. With the phone off, hold the Volume Down button and press and release the Power button.2. Youll boot into the menu you see above with the little skateboard guys. Select Clear Storage from the list by pressing the Volume Down button.
3. Press the Power button, and confirm by pressing Volume Up.
4. Sit back while your phone reboots in its virgin state.
Wednesday, October 29, 2014
How to Master Reset or Hard Reset a Sony Ericsson Z750a
To perform a master/hard reset on your Sony Ericsson Z750a you will need to:
Menu > Settings > scroll down to master reset > reset all
Read More..
Menu > Settings > scroll down to master reset > reset all
Nokia C5 keypad light solution problem jumper ways
Nokia C5 keypad light solution is possible with a few basic steps that are given in this post and by following diagram to repair keypad light in Nokia C5. The repairing diagram for Nokia C5 have some parts in line with red color.Nokia Asha 202 Touch Screen Problem Solution IC

These parts are used in Nokia C5 keypad light functions. After disassambly of Nokia C5 clean these parts that are inline with red color in above keypad light repairing diagram for Nokia C5. Because there can be rust or carbon due to water damages.
May you feel smell like burn parts. Apply hot air to dry the mother board.And do not apply much heat it can damage the mother board.Re sold or re flow of these parts can alos solve Nokia C5 keypad light problem.
Replace these parts and keypad led lights if the above solutions did not work for Nokia C5 keypad light solution.
for more detail and new tips and tricks about cellphone service problem keep visiting this page we will update cellphone service diagrams timely with new cellphone diagrams.some related post are also given bellow you can read them also for more information about cellphone.
Read More..

These parts are used in Nokia C5 keypad light functions. After disassambly of Nokia C5 clean these parts that are inline with red color in above keypad light repairing diagram for Nokia C5. Because there can be rust or carbon due to water damages.
May you feel smell like burn parts. Apply hot air to dry the mother board.And do not apply much heat it can damage the mother board.Re sold or re flow of these parts can alos solve Nokia C5 keypad light problem.
Replace these parts and keypad led lights if the above solutions did not work for Nokia C5 keypad light solution.
for more detail and new tips and tricks about cellphone service problem keep visiting this page we will update cellphone service diagrams timely with new cellphone diagrams.some related post are also given bellow you can read them also for more information about cellphone.
Tuesday, October 28, 2014
Nokia 2330 Classic Mic Problem Solution Jumper Ways
 Nokia 2330 Classic then you can not make a voice call and also you will not be able to make call recording in it.to solve this mic problem in Nokia 2330 Classic you can follow a few steps and can look at diagram bellow all cellular mobile repairing solution here nokia 105 white lcd light problemIn above diagram you can see mic and its ways all mic tracks are given in different colors and you can apply jumpers as shown in it.
You can replace mic also with this diagram and following to its tracks you can fix microphone problem in Nokia 2330 Classic.
for more detail and new tips and tricks about cellphone service problem keep visiting this page we will update cellphone service diagrams timely with new cellphone diagrams.some related post are also given bellow you can read them also for more information about cellphone.
Monday, October 27, 2014
Nokia X5 01 Earpiece Receiver Speaker problem repair solution
Heres the solution that may possibly help fix and repair a Nokia X5-01 with an earpiece speaker no audio sound problem.
In fixing this problem you may first check the speaker by using a multimeter or try installing a new replacement for it. If the speaker seems working fine but still there is no sounds can be heard on it. You may refer on the solution below for wihich it shows the Nokia X5-01 Earpiece Speaker connection line paths which can be used for tracing and applying jumper if the connection is cut-off.

There are filter coils,capacitors and protection resistors used on Nokia X5-01 earpiece speaker circuit connection. You may check and replace this components if found damaged.
In fixing this problem you may first check the speaker by using a multimeter or try installing a new replacement for it. If the speaker seems working fine but still there is no sounds can be heard on it. You may refer on the solution below for wihich it shows the Nokia X5-01 Earpiece Speaker connection line paths which can be used for tracing and applying jumper if the connection is cut-off.
Nokia X5-01 Earpiece Speaker Connection Tracks

There are filter coils,capacitors and protection resistors used on Nokia X5-01 earpiece speaker circuit connection. You may check and replace this components if found damaged.
Sunday, October 26, 2014
Nokia 2730c full MMC memory card problem solution
Heres a full Nokia 2730c MMC memory card problem solution that can be used to fix and repair nokia 2730c microSD memory card problems such as memory card not detected or memory card corrupted.
In some cases solving the MMC problem by only replacing the MMC controller chip might not work or does not solved the problem.This solution shows the MMC memory card circuit including the memory card transceiver chip voltage supply line paths for further MMC hardware troubleshooting on Nokia 2730c.
IF these said supply voltages were not present or being cut-off this will also result to MMC problem.

You may need to check all those corresponding supply voltage line paths before attempting to rework or replace the MMC transceiver IC.
In some cases solving the MMC problem by only replacing the MMC controller chip might not work or does not solved the problem.This solution shows the MMC memory card circuit including the memory card transceiver chip voltage supply line paths for further MMC hardware troubleshooting on Nokia 2730c.
IF these said supply voltages were not present or being cut-off this will also result to MMC problem.
Nokia 2730c MMC memory card problem solution

You may need to check all those corresponding supply voltage line paths before attempting to rework or replace the MMC transceiver IC.
Saturday, October 25, 2014
How to install Clockworkmod CWM Recovery on Verizon Samsung Galaxy S3 I535

This guide helps to flash CWM Recovery image for the root users on their Verizon Galaxy S III smartphone (model number I535). In this article if you’ll read all the instructions above presented, you’ll be able to install the ClockworkMod Recovery in one easy and friendly way normally if you’re an advanced Android user.
If your Android phone was rooted then is important to install CWM Recovery,this thing helps root android phone owners to install and custom ROMs, with CMW Recovery you’ll add new functions in the administration on your phone, will improve the performances with new options in a unique look and give you control to do everything you want in your Galaxy S3 without restrictions.
This tutorial is available only if you have a rooted Galaxy S3 on Verizon, be sure to apply all this information showed in this guide to make a good configuration for preparing your computer and your smartphone which you’ll needs for installation process .
Below we have what its need to know before make the CWM Recovery on Verizon S3 phone installation:
- First step is to root your devices using the guide for: Root Verizon Samsung Galaxy S3 I535 .
- Now enable USB debugging option on your Samsung Galaxy S3 device.
- Go to charge the smartphone’s battery, is important because if your phone going to power OFF while flashing the ClockworkMod is very bad for your device.
- Now disable the antivirus protection and antimalware programs which running on your phone.
- Use this CMW Recovery installation only on Verizon Samsung Galaxy S3 devices with the I535 model number.
- This guide should be applied only by advanced Android users. If you don’t have enough experience with the advanced configuration in Android operating systems, you should read this tutorial multiple times, and be sure that you know exactly how to apply this instruction on your devices. Also we recommend reading other tutorials more detailed in the same subject.
Disclaimer: Follow all the instructions carefully mentioned in this article, we should not be held responsible in any manner if you damage your device during the installation of custom recovery image and you should know that you’re applying these changes at your own risk.
Now you can start installing the custom recovery image file. If you cannot install CWM please feel free to ask for our help in comments section. But explain exactly step by step your problem.
Guide to “How to install Clockworkmod Recovery on Verizon Samsung Galaxy S3 I535”
- First download the CWM recovery image file from HERE
- Now connect your smartphone to your PC use the original USB cable.
- Copy the recovery.img file on your Galaxy S III Verizon on internal SDcard, be carefully, don’t make another new folder, just drag and drop the file on the internal SDcard on main folder.
- Now disconnect your phone device from your PC.
- Go to download and then install Terminal Emulator application on your smartphone from Google Play Store download .
- Now launch application the Terminal Emulator.
- In the Terminal Emulator app enter the next command: su
- Tap ‘Allow/ Grant’ button to allow root access for TE.
- Enter following command to install the CWM Recovery file: dd if=/sdcard/recovery.img of=/dev/block/mmcblk0p18 (this command will install the Clockworkmod Recovery on your device).
- Now test to see if was successfully installed. Type this command in Terminal Emulator app: reboot recovery
- Your device will restart into CWM Recovery menu and now you can use it to flash new custom ROMs and other file and applications.
Note: If you want to restart your Galaxy S3 Verizon phone into normal Android mode, please select the ‘reboot system now’ option from the CWM Recovery main menu and now wait for doing this process.
Now your phone has CWM Recovery installed. If you have problems and you didn’t manage to flash the files, feel free to ask us in comments section and let us to know step by step all the details and we will try to help you to complete the installation.
Remember you’ve installed this all files at your own risk and you shouldn’t blame us in case your smartphone got damage or you lost any files during the installation
Friday, October 24, 2014
Blackberry 9105 cellular phone trackpad ways solution
blackberry 9105 trackpad ways solution ,blackberry 9105 trackpad ways repair solution,blackberry 9105 trackpad ways not working solution,blackberry 9105 trackpad ways repair guide solution ,blackberry 9105 trackpad ways jumper solution,blackberry 9105 trackpad ways jumper tricks solution,blackberry 9105 trackpad ways tricks guide solution if u have blackberry 9105 trackpad problem phone many time water damage phone show this problem set on but not working trackpad see my way i hope solved your problem
1st check change trackpad i think done your phone but not done see all line i think done but not done see my last step i hope now done i show my solution see and try step by step 100% working many time this solution see my solution all blackberry solution have this bogger so see and enjoy our solution blackberry 8520 vusd jumper Solution
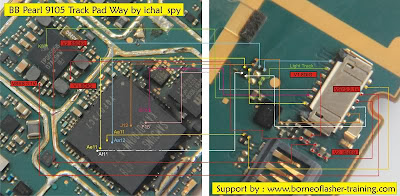
see this solution and jumper stepby step 100% working this and dont forget visit my blogger.
Thursday, October 23, 2014
Blackberry 9500 Cellular Phone Lcd Repair Solution
blackberry 9500 cellular phone lcd repair solution,blackberry 9500 cellular phone lcd Not working solution,blackberry 9500 cellular phone lcd jumper ways repair solution,blackberry 9500 cellular phone lcd repair ways ,blackberry 9500 cellular phone lcd repair tips and tricks,blackberry 9500 cellular phone lcd repair without ic change ,blackberry 9500 cellular phone lcd damage pine but jumper done solution,
if u have blackberry 9500 cellular phone lcd not working means display not working i have 100% tested solution try my way i hope solved your problem 1st try to check display bess i hope solved your problem ,Blackberry 9105 cellular phone trackpad ways solution
but not solved try again 1 way change display i hope solve but not solve try this my 100% tested way see
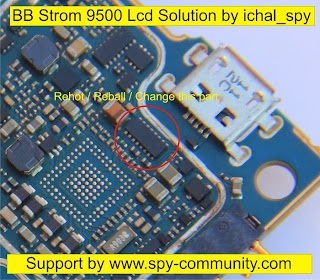
my diagram and see this ic and 1st work this ic reheat this ic i hope solved your problem not solve try to change 100% working now many time tested me this solution.
Nokia C5 Charger Not Supported Error Problem Solution
This solution may help fix if the Nokia C5 shows "charger not supported error when the battery charger is plug-in. If the error message shows, this probably cause by a faulty hardware components on Nokia C5 PCB board.
Just refer to the solution below and locate the highlighted components for it is part of the charging indication components. Nokia C3 Display Problem Solution - White, blue blank screen displays
 Hints for repair a Nokia C5 charger not supported problem:
1. Try to use another phones battery and charger.
2. Check/clean the battery terminals and connector
3. Check/ replace the 47K resistor as shown on the solution above
Read More..
Just refer to the solution below and locate the highlighted components for it is part of the charging indication components. Nokia C3 Display Problem Solution - White, blue blank screen displays
Nokia C5 Charger Not supported problem solution

1. Try to use another phones battery and charger.
2. Check/clean the battery terminals and connector
3. Check/ replace the 47K resistor as shown on the solution above
Blackberry 8900 Camera Solution 100 tested solution
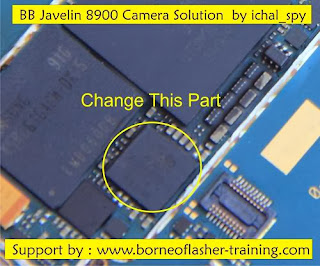
blackberry 8900 camera not working open camera show blank solution
blackberry camera not open solution,blackberry 8900 camera have but not open solution,blackberry 8900 camera error not open solution,blackberry 8900 water damage phone camera not open solution start open camera show only display blank solution,blackberry 8900 open camera show camera stand by solution ,blackberry 8900 camera on start hang phone solution blackberry many phone this problem 1st try full wash phone and check few ic 2nd check bluetooth ic chcek this ic and see last my solution
see
blackBerry 8520 sim ways solution 100% tested solution
blackberry 8900 camera not working open camera show blank solution
blackberry camera not open solution,blackberry 8900 camera have but not open solution,blackberry 8900 camera error not open solution,blackberry 8900 water damage phone camera not open solution.Wednesday, October 22, 2014
Factory Reset on Android Device
Factory reset is a very useful default feature which it’s in all Android devices, this feature can be very important in many hard situations, if you made some modifications, or you delete everything from your device, except the Android itself, if you we’ll go and you’ll make a factory reset, your device will look like new.
If you ask yourself “what does a factory reset do?”it’s good to know that, factory reset feature allows you to delete everything on your device (contacts, call logs, SMS messages, applications or data, have also an option to erase all information stored in the memory card (photos, videos, or any type of data stored in memory card).
When you want to sell your Android device Factory reset is a great tool, in this way your buyer don’t can access your private information, another situation when you can use the Factory Reset function it is also if your device begin to move slowly because you have installed many applications, when you make some wrong updates in your device and it’s hard to know what not work correctly, for example some firmware are not compatible with the others and they recommend you to make a Factory Reset.
It’s also very useful when updating to another firmware. Some types of firmware are not compatible with the others and they will require you to do a factory reset.
Be carefully because if you made a factory reset isn’t any way to recover your date after that, if you didn’t do a backup before.
Please note that there isn’t any way to recover data after a factory reset if you didn’t perform backups before.
For make an android backup you will normally need to have a root level access on your Android device and ClockworkMod installed
How factory reset on Android devices ?
It’s very easy to make a factory reset in your Android device:
Settings > Backup & reset > Factory data reset > Reset phone
Note: If you want to erase USB storage, you can check Erase USB storage for make this.
After these operations, please check if in your device it’s on factory parameters and nothing remains on the smartphone.
I made a short video about “how factory reset on Android devices “to see how this thing is done:
Saturday, October 18, 2014
Nokia 2330 Classic Charger Not Responding or Not Supported
when you plug in charger to Nokia 2330 Classic and it indicates a Charger Not Responding or Charger Not Supported notification it can be solve with a few simple steps that i am going to teach in this post.
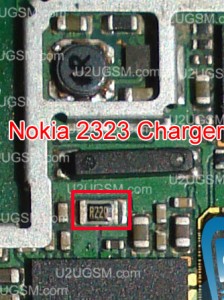
So Look at the above diagram and try some basic tips and tricks.
Try to change charger in first step and if replacement of charger do not work for solving the problem you can dis assemble Nokia 2330 Classic and then check all these parts that are given in diagrams given in this post.
Clean these parts with electronics cleaner and dry them with hot air.Check these parts with meter and if any of them is not showing proper value it can be solve with applying jumpers.Do not apply much hot air it can harm your skin and can also damage mother board of Nokia 2330 Classic.
for more detail and new tips and tricks about cellphone service problem keep visiting this page we will update cellphone service diagrams timely with new cellphone diagrams.some related post are also given bellow you can read them also for more information about cellphone.
Friday, October 17, 2014
How to Use Car Infotainment System on Sony Xperia Z1 Compact
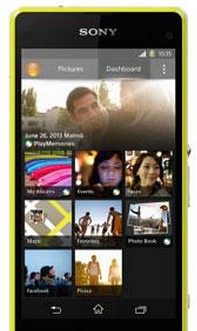 Connect your device to a MirrorLink™ certified car infotainment system using a USB cable to, for example, use a navigation app or play music from your device while driving. The car infotainment system mirrors all features on your device and gives you access to all applications. When connected, you can navigate the apps using the car infotainment system controls.
Some applications may not be available in driving mode. Also, protected data, such as videos that are strictly protected under Digital Rights Management (DRM), is not made available via MirrorLink™.
To connect your device to a car infotainment system
• Connect your device and the car infotainment system using a USB cable. The Lcd of your device appears on the Lcd of the infotainment system.
Warning: You may need to start MirrorLink™ manually if the connection between your device and the infotainment system is not established automatically.
To start MirrorLink™ manually
1. Make sure that your device is connected to the car infotainment system using a USB cable.
2. From your Home Lcd, tap Apps icon.
3. Find and tap Settings > Xperia™ Connectivity > Start MirrorLink™.
4. Tap OK.
Nokia X2 05 Mic problem solution Microphone not working
If mic is not working in Nokia X2-05. Microphone solution with jumpers, Low voice of Nokia X2-05 mic problem solution, Nokia X2-05 mic jumpers to make it solve.Nokia X2-02 Keypad Not Working Problem Solution Jumper Ways

If mic is not working or have a low voice it can be fault of mic and housing. Check Nokia X2-05 housing ( body ). All housing have a small whole at the point of mic. In some cases rust or dust cover this point and the voice can not reach proper to the mic point so make it clean if there is some dust on it.
After dis assembly of Nokia X2-05 look at the motherboard for rust carbon or burn parts. If you found some rust or carbon apply electronics cleaner on the mother board and apply hot air to make it dry proper.
Applying too much heat can damage the mother board and parts.It also can be harm for your skin.So keep in mind about normal heat flow when making it dry.
Remove mic and check all these tracks that are provided in above diagram to solve mic problem in Nokia X2-05. In diagram two different color lines are given to identify all parts that are used to solve Nokia X2-05 mic problem with jumpers.
If some parts are missing or damage apply jumper on these points where small circles are pointing in nokia mic repairing diagram above.
Thursday, October 16, 2014
Nokia 2680s Charging ways
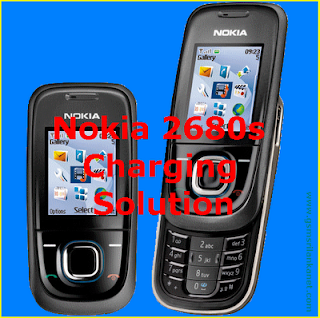
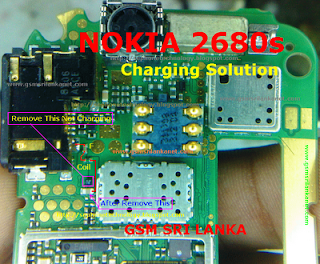
Nokia 2680s Not Charging
Nokia 2680s Charge problem
Nokia 2680s
Wednesday, October 15, 2014
How to Factory Reset Hard Reset Motorola Moto G
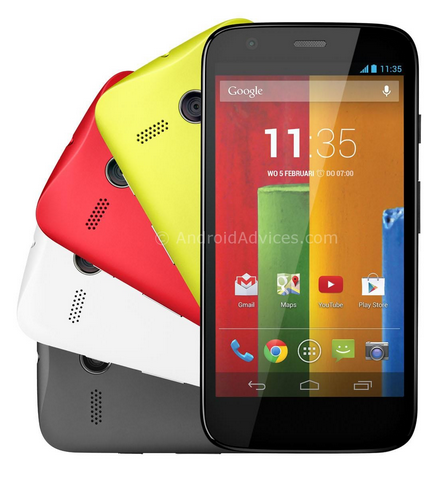
Backup & restore
Your Google account data is backed up online. If you reset or replace your phone, just log in to your Google account to restore the contacts, events, and other details you synced with the account. To choose what syncs with the account, touch Apps > Settings > Google, touch your Google account, and check things to sync. Please note that text messages, call logs, and items stored on your phone will not be restored. To restore your Google Play™ Store apps, see “Take care of your apps”.
Resetting Motorola Moto G on Settings:
Warning: All downloaded apps and user data on your phone will be deleted. Data on the cloud will not be deleted.
Your Google account data is backed up online. If you reset or replace your phone, just log in to your Google account to restore the contacts, events, and other details you synced with the account. To choose what syncs with the account, touch Apps > Settings > Google, touch your Google account, and check things to sync. Please note that text messages, call logs, and items stored on your phone will not be restored. To restore your Google Play™ Store apps, see “Take care of your apps”.
Resetting Motorola Moto G on Settings:
- On your Home Lcd, touch Apps.
- Go to Settings > Privacy.
- Tap on Factory Data Reset.
- Then tap Reset phone.
- And Erase everything to confirm the reset.
Warning: All downloaded apps and user data on your phone will be deleted. Data on the cloud will not be deleted.
How to Hard Reset Motorola Moto G:
These steps is also helpful when your Motorola Moto G is unresponsive or frozen and theres no way to access the settings. If it is frozen, remove the battery and reinsert it after a few minutes.
- Power up the device pressing both Volume UP and Down keys at the same time. Use the Volume down key to highlight recovery mode and volume up to select it.
- When in recovery mode, you will see an android with a red triangle. Press Volume up and Volume down at the same time. This will bring up a blue menu at the top of the Lcd.
- Press Volume down to select "wipe data/factory reset" and press the Power key to select it.
- Now press Volume down to highlight Yes and press power to select it.
- Finally, when the device finishes it will have "reboot system now" selected. Just press power to select that option.
Tuesday, October 14, 2014
Local mode problem test mode problem some general facts
What is local mode?
Local mode is triggered either by a service battery / jig from Nokia being used to power the phone,
A faulty battery, a faulty phone or the phone has got "liquid ingress” also indicate local mode in display
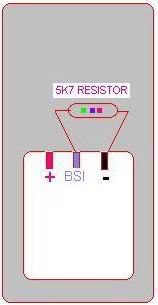
See this picture
in the above picture when BSI is grounded with a resistor of
5.1k to 7k1 and insert battery, nokia sets displays local/test mode on Lcd
By this way we can trigger the set in to local mode and software operation through USB
Local mode is triggered for reading & writing phone pm area (EEPROM),
File system formatting etc.
What is test mode?
Test mode is for doing file system removing like full factory defaults
Also can do pm area re-writing and for unlocking the phone
Some phones displays either of these modes directly when battery is inserted to the phone
and we gets in this condition for repairing
This may be either by a faulty battery or damaged hardware in the handset.
We can assume this is a BSI related fault
TEST THE PHONE WITH A WORKING BATTERY
Now what is BSI?
BSI, the thermistor used to sense the battery temperature and shut down the charger
Their is an internal circuit from power IC to BSI lead of battery
this circuit manages charging mechanism and battery sensing.
Faulty parts in this BSI circuit may lead to the local/test mode
Or finally we have to suspect power ic
Here NOKIA 1200 schematic is used to illustrate BSI way and possible reasons for this fault.
blue colored parts are related to the BSI function .we have to trace from battery connector, capacitors, and then other parts. These parts can be identified by reading the higher level schematic of the phone. By following this logic you may be able to trace local mode in any nokia phone
Read More..
Local mode is triggered either by a service battery / jig from Nokia being used to power the phone,
A faulty battery, a faulty phone or the phone has got "liquid ingress” also indicate local mode in display
See this picture
in the above picture when BSI is grounded with a resistor of
5.1k to 7k1 and insert battery, nokia sets displays local/test mode on Lcd
By this way we can trigger the set in to local mode and software operation through USB
Local mode is triggered for reading & writing phone pm area (EEPROM),
File system formatting etc.
What is test mode?
Test mode is for doing file system removing like full factory defaults
Also can do pm area re-writing and for unlocking the phone
Some phones displays either of these modes directly when battery is inserted to the phone
and we gets in this condition for repairing
This may be either by a faulty battery or damaged hardware in the handset.
We can assume this is a BSI related fault
TEST THE PHONE WITH A WORKING BATTERY
Now what is BSI?
BSI, the thermistor used to sense the battery temperature and shut down the charger
Their is an internal circuit from power IC to BSI lead of battery
this circuit manages charging mechanism and battery sensing.
Faulty parts in this BSI circuit may lead to the local/test mode
Or finally we have to suspect power ic
Here NOKIA 1200 schematic is used to illustrate BSI way and possible reasons for this fault.
blue colored parts are related to the BSI function .we have to trace from battery connector, capacitors, and then other parts. These parts can be identified by reading the higher level schematic of the phone. By following this logic you may be able to trace local mode in any nokia phone
Monday, October 13, 2014
Nokia X2 00 Ringer solution
Nokia X2-00 Ringer solution
Nokia X2-00 ringer solution without ic.
How to repair Ringer Ic Nokia X2-00.Ringer ic Shorting Methods.
how to make jumper ringer buzzer ic in Nokia X2-00.
make jumper like diagram and the problem will be solved.

nokia X2-00 light ic jumper
nokia X2-00 ringer problem
nokia X2-00 ringer solution
nokia X2-00 ringer ic jumper
nokia X2-00 ringer jumper
X2-00 ringer ic jumper
X2-00 light ic jumper
X2-00 ringer problem
X2-00 ringer solution
nokia X2-00 ringer problem solution
Nokia X2-00 ringer solution without ic.
How to repair Ringer Ic Nokia X2-00.Ringer ic Shorting Methods.
how to make jumper ringer buzzer ic in Nokia X2-00.
make jumper like diagram and the problem will be solved.

nokia X2-00 light ic jumper
nokia X2-00 ringer problem
nokia X2-00 ringer solution
nokia X2-00 ringer ic jumper
nokia X2-00 ringer jumper
X2-00 ringer ic jumper
X2-00 light ic jumper
X2-00 ringer problem
X2-00 ringer solution
nokia X2-00 ringer problem solution
Thursday, October 2, 2014
Asansam box Version 2 4 1 Released Fix Server Reply Unknown!
Asansam box Version 2.4.1 Released
Fix
Server Reply Unknown Error
After Press On Go Support File Button
Before Fix
![Asansam]()
After Fix
Download
--------------------------
ASANSAM_rev2.4.1.rar
----------------------
Copy and extract to c:/asansam2
Just For Warm UP
BR
ASANGSM TEAM
Read More..
Fix
Server Reply Unknown Error
After Press On Go Support File Button
Before Fix
Quote:
| Generating Link... OK Server Reply Unknown! |
After Fix
Quote:
| Generating Link... OK Sending Link to Browser...OK |
Download
--------------------------
ASANSAM_rev2.4.1.rar
----------------------
Copy and extract to c:/asansam2
Just For Warm UP
BR
ASANGSM TEAM
Wednesday, October 1, 2014
Subscribe to:
Posts (Atom)


